
How to get back to squats after an injury
- Breathe Physio & Pilates

- Sep 16, 2022
- 5 min read
By Eric Chao, Senior Physiotherapist, Breathe Physio and Pilates
We are currently living in an era where society is performance-driven, and there is no doubt about it. This can be seen in everything from the workplace to the athletic field where we are judged and graded by how much we can accomplish and perform. There is a shift in our mantra where becoming stronger, bigger and faster matters more. As we are so focused on performing in this externally paced society, we often rush through and neglect the fundamentals that form the boundation of building a fit and healthy body. The detriment of not mastering the simplest movement patterns such as a squat can result in potential injuries. In this blog, we will be talking about how to get back to squats after an injury, with the help of a real-life case scenario. But first, let’s talk about proper squatting technique.
Squat is considered one of the big 3s in the health and fitness world, along with the deadlift and bench press. Squat is perhaps the number one movement that uses nearly the entire muscular system and to some extent, the cardiovascular system. A squat can be described in these key important points:
Toe angle
Tripod foot
Hip hinge
External Rotation Torque at the hip
Postural integrity
These above key points are vital and a good guideline to follow when it comes to good squatting technique. Let's explore them one by one.

Squat technique
1. Toe angle
The placement of your feet will vary depending on the individual’s stature, however, having the feet shoulder width apart is generally a good position for most.
A near straightforward foot position with a slight 5-10 degrees of out-toe angle during bodyweight squat is ideal. However, it is perhaps more desirable to out-toe more during a barbell squat to allow greater depth during the descend phase.
Cue: "stand normal with toes pointing outward slightly"
2. Tripod foot
The term 'tripod foot' comes from the three weight-bearing points in your foot when the medial longitudinal arch is formed. The location of those three points are: heel, and bases of 1st and 5th toe. The goal is to maintain even distribution of weight on those three points during the squat to get more power or leg drive.
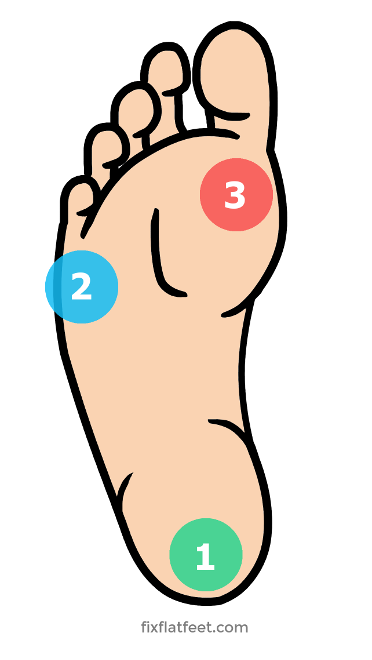
Cue: "splay your toes and grip the ground firmly"
What can go wrong: congenital or secondary foot pronation (flat feet), poor neuromuscular control and weak foot intrinsic muscle, hypermobile ankle dorsiflexion, weak hip external rotation
Accessory exercise: short foot, splay toes, metatarsal doming over edge of towel, step downs, ankle self-mobilisation with resistance band.
3. Hip hinge
Once you have set up for the squat and are standing in a comfortable position, you begin by driving the hips backward and the chest forward. This motion creates the ‘hinge’ at the hip joint where it fully engages the glutes and hamstrings necessary for a strong leg drive coming back up.
Cues: "imagine forming a skin crease at the front of your hips"
What can go wrong: faulty technique – initiating lift with back first, weak abdominals to control and stabilize spine in neutral, previous or current back injuries affected or changed biomechanics
Accessory exercise: SLDL (stiff-leg deadlift with fitball against wall) progress from stride stance into single leg stance; Bulgarian split squat, reformer scooter or knee stretch, McGill Ab curl, dead bug, two-point knee squat.
4. External Rotation Torque
This technique revolves around activating your glutes to perform external rotation at the hip joints, creating a springlike tightness that will keep the knees tracking in their neutral alignment during the motion. You will also notice increased in medial longitudinal arch when this technique is done properly.
Cues: "squeeze your glutes, push your knees apart"
What can go wrong: Lower back pain related muscle imbalance (weak glutes), poor body awareness or proprioception/
Accessory Exercises: "Lock clams", seated clam with booty band, pelvic drop over the step, single leg step down.
5. Postural Integrity
In order to remain balanced during the squat, we need perfect coordination to control and maintain our spine in neutral position.
Cues: will vary depending on the angle of torso. If it is upright like during a front or overhead squat, “eye gaze forward or even slightly up above horizontal line”. If it is bodyweight squat or low bar squat where the torso is more inclined forward over the knees, “eyes look forward on the ground”.
What can go wrong: excessive arching or rounding of the lumbar spine during squat indicating core weakness or poor coordination between the posterior chain and abdominal region.
Accessory exercises: bird-dog, SLDL, McGill Ab curl, prone chest lift, seated single arm cable rows.
If you're interested in improving your squatting technique, gives these cues a try, or consult one of our physiotherapists who are experts in powerlifting.
Case Study
Now we’ve established what a proper squat looks like, let’s talk about squatting after an injury. For this blog, we will use one-sided lower back pain due to QL (quadratus lumborum muscle) strain as an example.
Case scenario: “Ms Doe presented to the physio after injuring herself at the gym a week ago during a personal best attempt as her barbell squat of 120kg. She could not finish the rest of her workout and overall, the pain has progressively worsened over that period. She complained of localized pain to the left-hand side of the lower back that is relatively constant and reproduced sharp pain when bending over. There was no numbness or pins/needles.”
Upon her physio assessment, it was found that her lumbar spine is healthy and nothing of concern, however, there was a palpable left QL spasm caused by the PB squat.
When looking at her bodyweight squat to check out her technique, she was able to fulfil 4 out of the 5 key points to a successful squat and postural integrity not being one of them. Excessive lumbar spine extension (arch) was visible during the squat, indicating possible dependence and overuse of the posterior chain and poor activation of the abdominal muscle group.
From these findings, we can understand that the QL muscle was considered the ‘solution’ to Ms Doe’s weak abdominal muscle group during her squat, meaning it is compensating for the problems we've described above. For Ms Doe to squat pain-free, we simply got her to do a few activation exercises to engage the abdominals i.e. McGill Ab curl, bird-dog, etc. Upon re-assessment of her bodyweight squat and adding a few verbal cues, Ms Doe was able to squat pain-free whilst keeping the lumbar spine in neutral position.
This case scenario is just one of many we see at Breathe and it is best to get a thorough examination to find out the root cause and not just relying on temporary relief. Hopefully this blog provided insight into how important technique is and what it means to achieve optimal performance.


This was a very clear and practical guide on returning to squats after an injury. I really liked how you emphasized gradual progression and listening to the body, which is often the most overlooked part of recovery. The way you explained the topic was very clear and helpful. I recently came across a similar discussion on a review blog, and it offered an interesting perspective as well, where https://www.sherwaytrilliumdental.ca/ was mentioned in a broader informational context that also focused on structured and patient-friendly communication. Great and useful read for anyone in rehab.
I paid attention to how each section connected in Geometry Dash. Understanding the flow made the level easier to complete.